Cloudnet AEWS 10주차 스터디를 진행하며 정리한 글입니다.
이번 포스팅에서는 쿠버네티스 시크릿 관리 도구인 Vault를 Jenkins를 통한 CI ArgoCD를 통한 CD로 파이프라인을 구성해보겠습니다.
이번 실습은 기존 가시다님이 아닌 유형욱님께서 진행해주셨습니다. 감사합니다.
Jenkins + Vault (AppRole) -> CI
CI 파이프라인에서 정적 시크릿을 외부에 저장하고 관리할 경우 사용할 수 있는 방안으로 Vault를 활용하는 방법에 대한 실습입니다.
Jenkins에서 Vault AppRole 방식을 활용하여 KV 시크릿을 안전하게 조회할 수 있습니다.
1. Jenkins에서 Vault Plugin을 설치
Jenkins에서 Vault provider를 사용하기 위해 Plugins을 설치합니다.

2. Vault AppRole 정보 확인 및 Jenkins에 Vault 설정 및 Credentials 추가
vault plugin configuration에 들어가서 vault credentials에 Role ID와 Secret ID를 입력합니다.

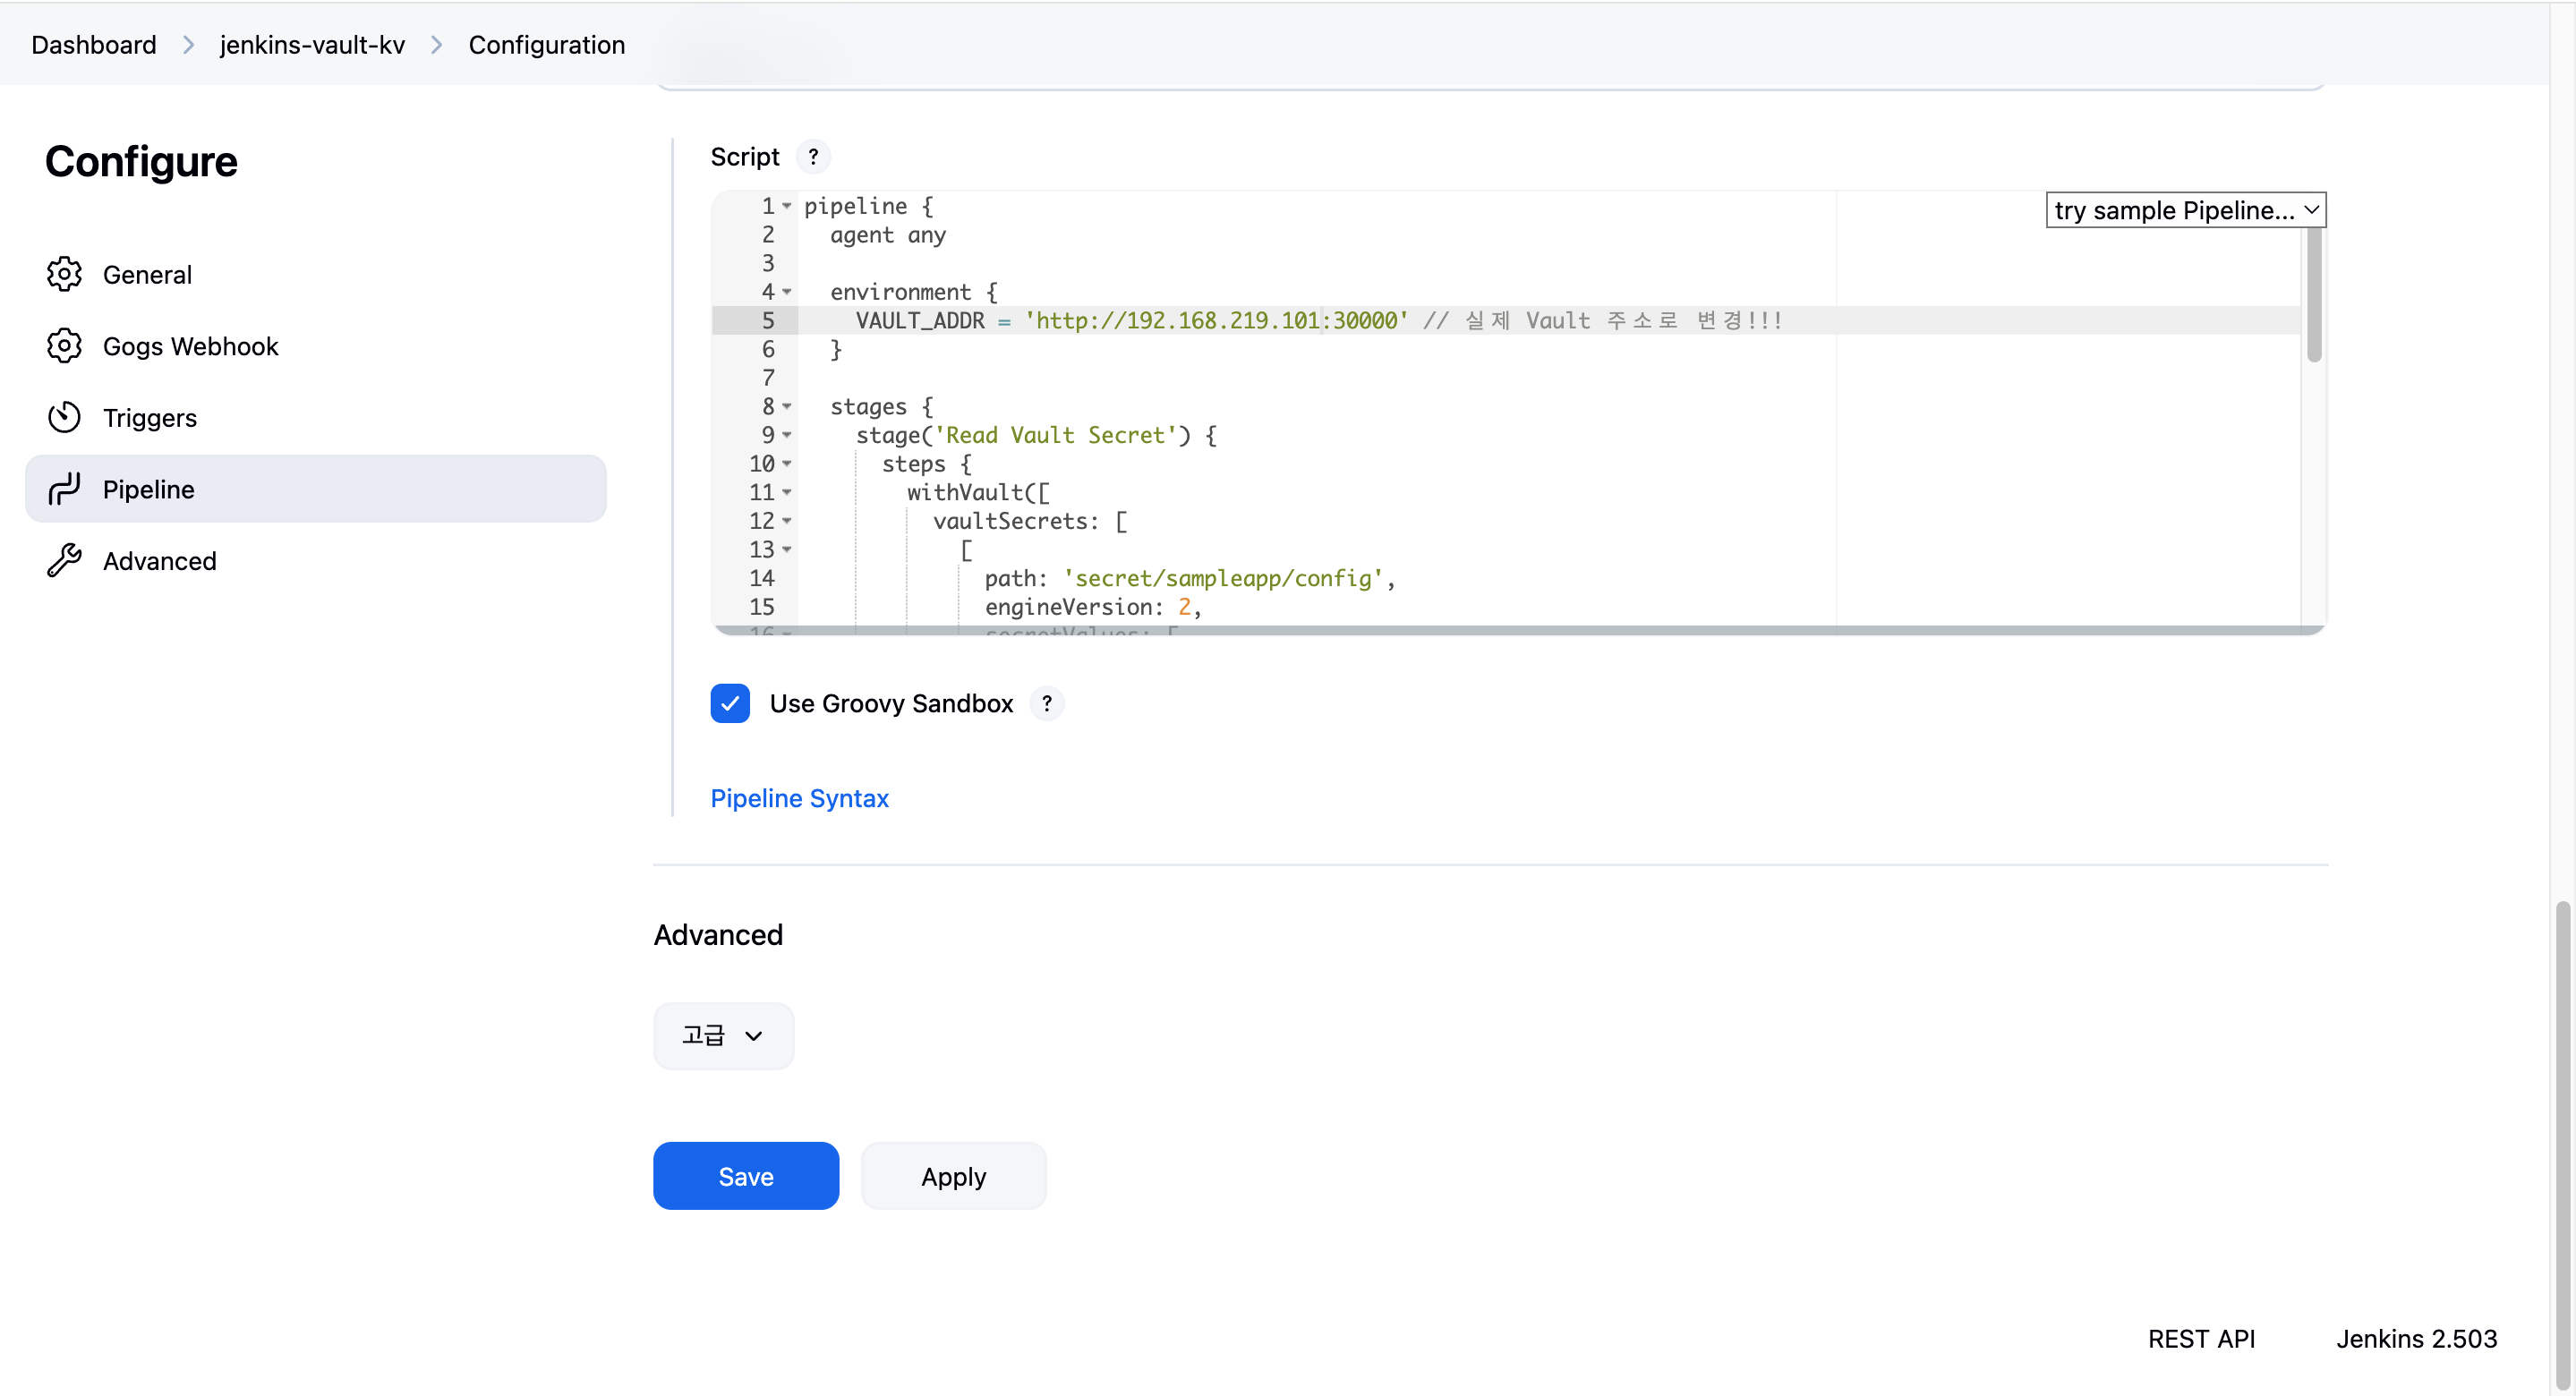
3. Jenkins Pipeline Job 생성
Jenkins에서 vault에 등록한 approle 기반으로 유저이름과 비밀번호를 읽어와서 환경변수로 사용하는 CI 파이프라인을 위한 Jenkinsfile을 작성합니다.
pipeline {
  agent any

  environment {
    VAULT_ADDR = 'http://192.168.219.101:30000'
  }

  stages {
    stage('Read Vault Secret') {
      steps {
        withVault([
          vaultSecrets: [
            [
              path: 'secret/sampleapp/config',
              engineVersion: 2,
              secretValues: [
                [envVar: 'USERNAME', vaultKey: 'username'],
                [envVar: 'PASSWORD', vaultKey: 'password']
              ]
            ]
          ],
          configuration: [
            vaultUrl: "${VAULT_ADDR}",
            vaultCredentialId: 'vault-approle-creds'
          ]
        ]) {
          sh '''
            echo "Username from Vault: $USERNAME"
            echo "Password from Vault: $PASSWORD"
          '''
          script {
            echo "Username (env): ${env.USERNAME}"
            echo "Password (env): ${env.PASSWORD}"
          }
        }
      }
    }
  }
}
하지만, 파이프라인이 실패했습니다.
콘솔 아웃풋 로그를 확인해봤을 때, 다음과 같은 로그인 것을 보아 vault에 등록한 AppRole 토큰의 TTL이 지나 만료가 된 것을 알 수 있습니다. (1시간 지나면 만료되도록 AppRole 생성시 TTL 부여)
Vault responded with HTTP status code: 400
Response body: {"errors":["invalid role or secret ID"]}
Started by user yoo
[Pipeline] Start of Pipeline
[Pipeline] node
Running on Jenkins in /var/jenkins_home/workspace/jenkins-vault-kv
[Pipeline] {
[Pipeline] withEnv
[Pipeline] {
[Pipeline] stage
[Pipeline] { (Read Vault Secret)
[Pipeline] withVault
[Pipeline] // withVault
[Pipeline] }
[Pipeline] // stage
[Pipeline] }
[Pipeline] // withEnv
[Pipeline] }
[Pipeline] // node
[Pipeline] End of Pipeline
com.bettercloud.vault.VaultException: Vault responded with HTTP status code: 400
Response body: {"errors":["invalid role or secret ID"]}

	at PluginClassLoader for hashicorp-vault-plugin//com.bettercloud.vault.api.Auth.loginByAppRole(Auth.java:524)
	at PluginClassLoader for hashicorp-vault-plugin//com.datapipe.jenkins.vault.credentials.VaultAppRoleCredential.getToken(VaultAppRoleCredential.java:53)
Also:   org.jenkinsci.plugins.workflow.actions.ErrorAction$ErrorId: 61e93543-f3ab-40cf-853d-7e1dce661fec
Caused: com.datapipe.jenkins.vault.exception.VaultPluginException: could not log in into vault
	at PluginClassLoader for hashicorp-vault-plugin//com.datapipe.jenkins.vault.credentials.VaultAppRoleCredential.getToken(VaultAppRoleCredential.java:56)
	at PluginClassLoader for hashicorp-vault-plugin//com.datapipe.jenkins.vault.credentials.AbstractAuthenticatingVaultTokenCredential.getToken(AbstractAuthenticatingVaultTokenCredential.java:65)
	at PluginClassLoader for hashicorp-vault-plugin//com.datapipe.jenkins.vault.credentials.AbstractVaultTokenCredentialWithExpiration.authorizeWithVault(AbstractVaultTokenCredentialWithExpiration.java:118)
	at PluginClassLoader for hashicorp-vault-plugin//com.datapipe.jenkins.vault.VaultAccessor.init(VaultAccessor.java:69)
	at PluginClassLoader for hashicorp-vault-plugin//com.datapipe.jenkins.vault.VaultAccessor.retrieveVaultSecrets(VaultAccessor.java:203)
	at PluginClassLoader for hashicorp-vault-plugin//com.datapipe.jenkins.vault.VaultBindingStep$Execution.doStart(VaultBindingStep.java:115)
	at PluginClassLoader for workflow-step-api//org.jenkinsci.plugins.workflow.steps.GeneralNonBlockingStepExecution.lambda$run$0(GeneralNonBlockingStepExecution.java:77)
	at java.base/java.util.concurrent.Executors$RunnableAdapter.call(Unknown Source)
	at java.base/java.util.concurrent.FutureTask.run(Unknown Source)
	at java.base/java.util.concurrent.ThreadPoolExecutor.runWorker(Unknown Source)
	at java.base/java.util.concurrent.ThreadPoolExecutor$Worker.run(Unknown Source)
	at java.base/java.lang.Thread.run(Unknown Source)
Finished: FAILURE
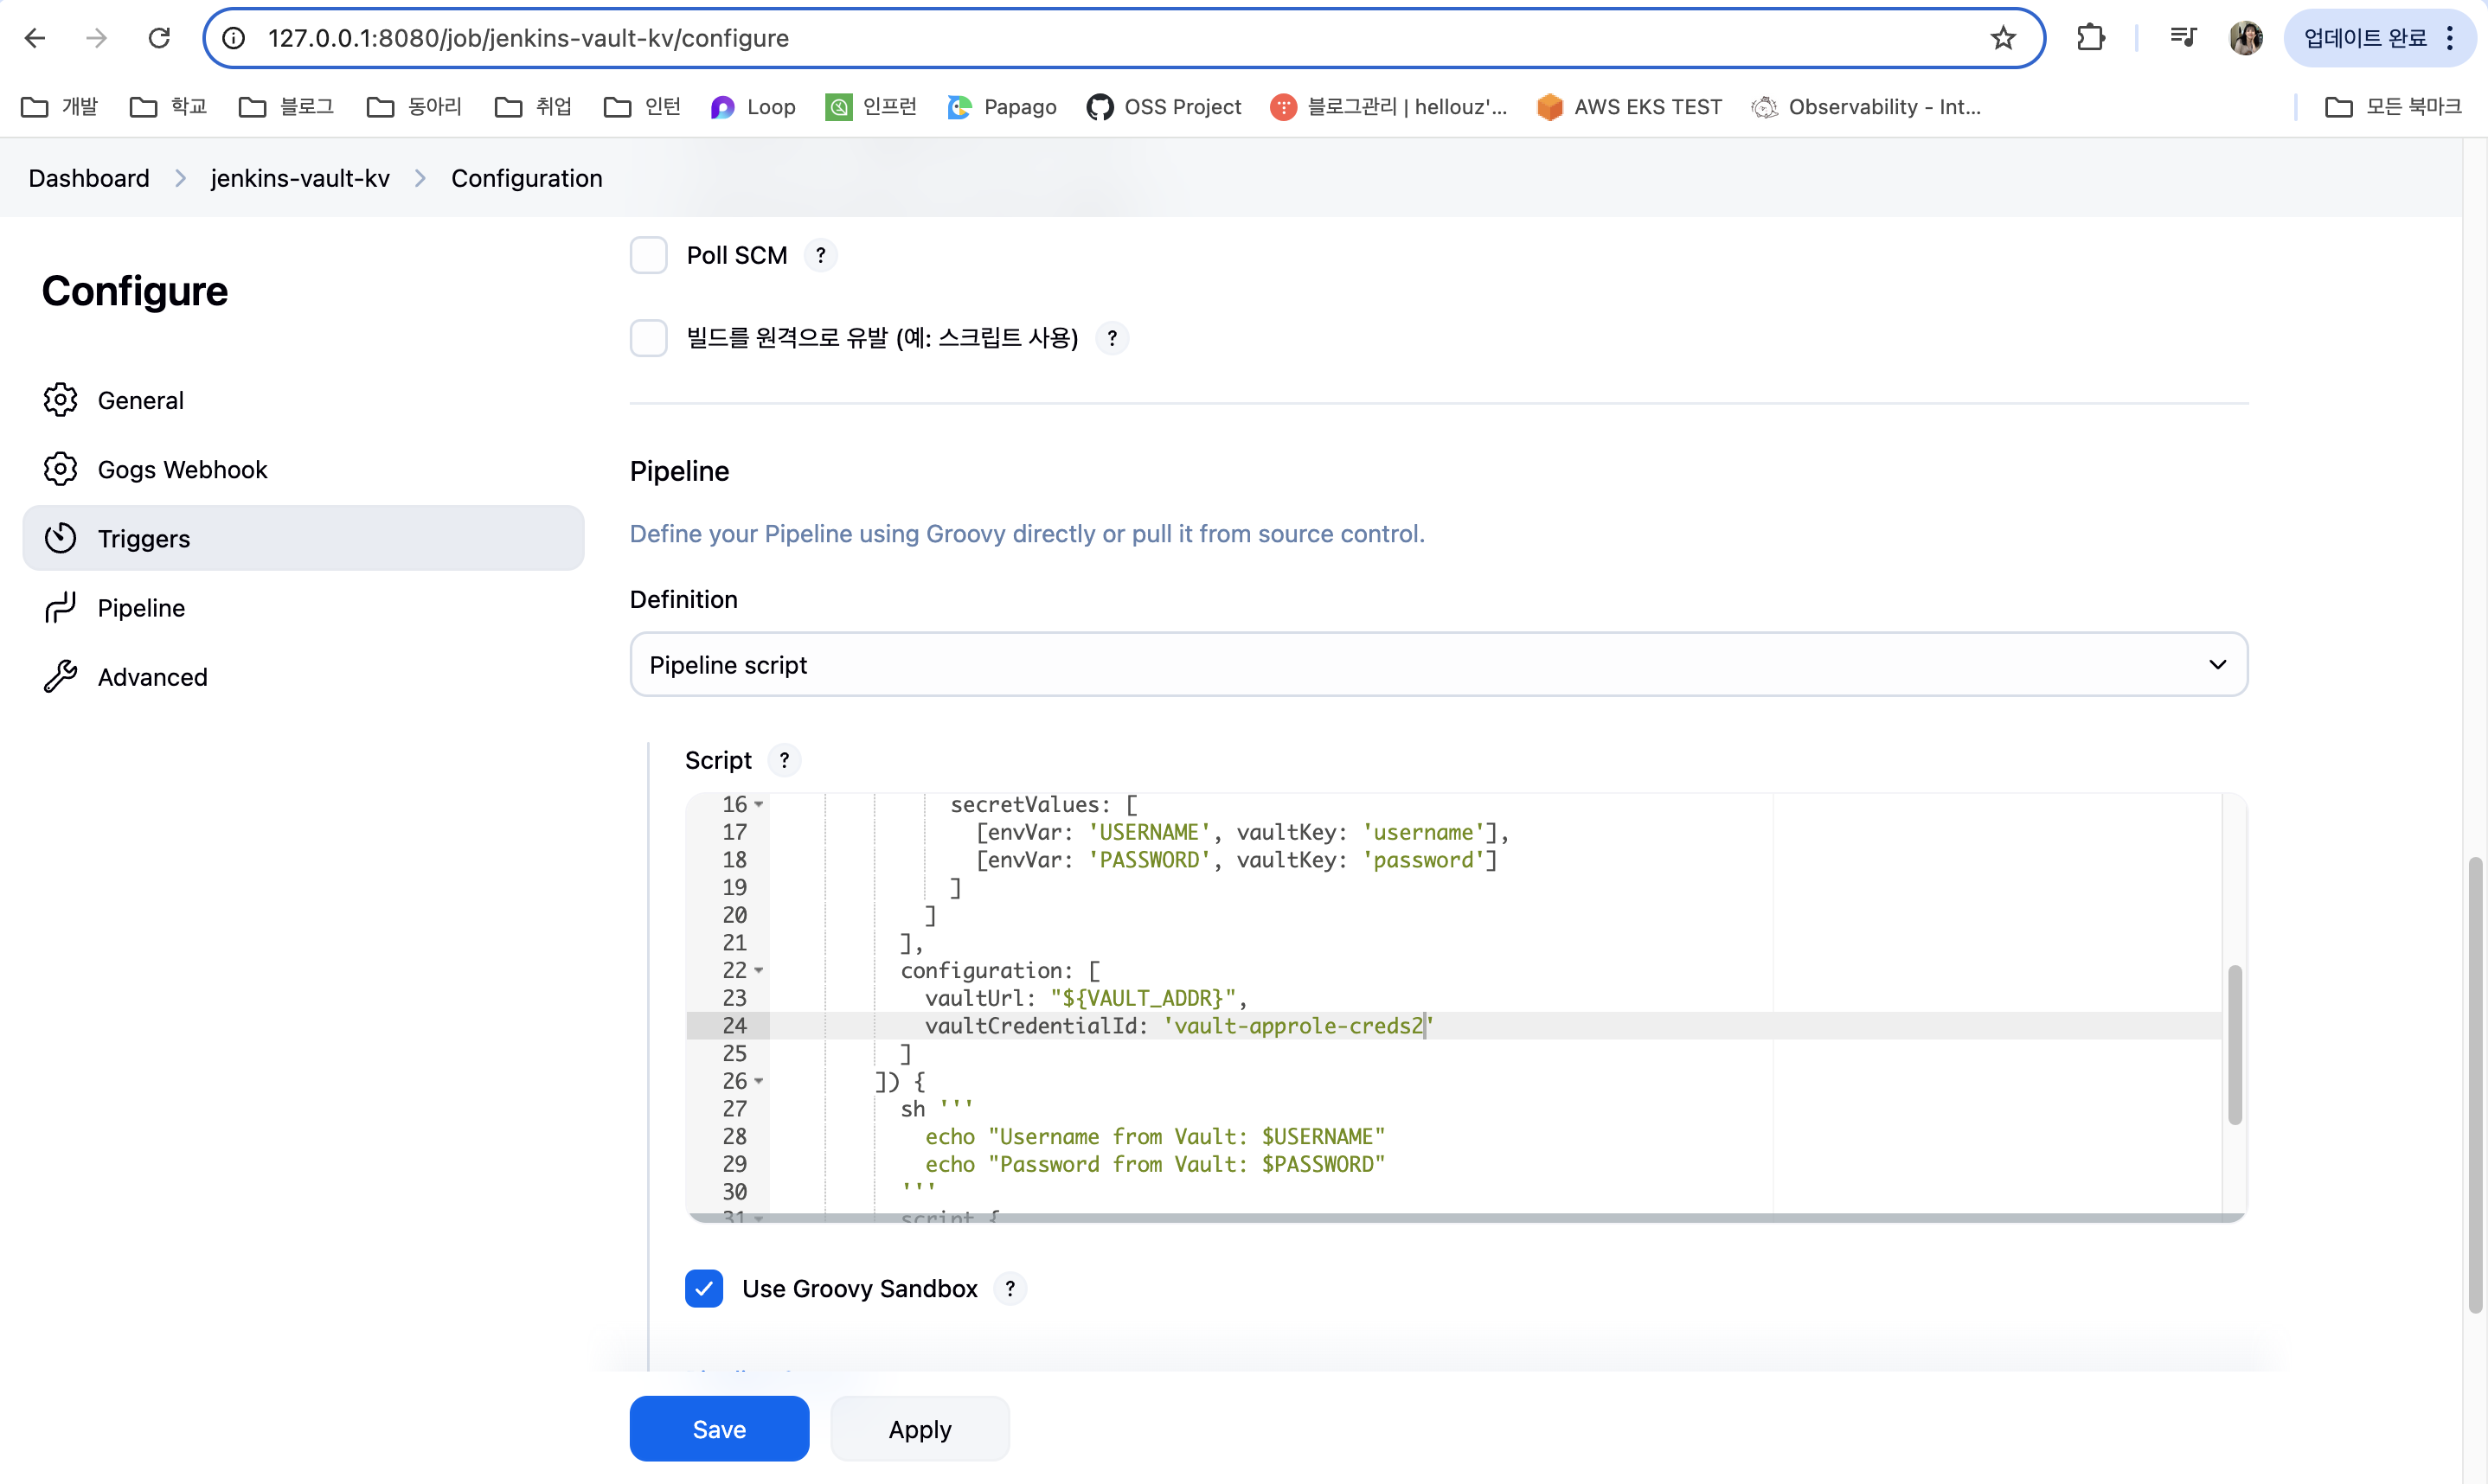
따라서 새롭게 AppRole을 업데이트 해준 뒤, 해당 AppRole을 다시 Jenkins의 Credentials로 등록하여 준 후, 기존 vaultCredentials 값에서 변경하였더니 (vault-approle-creds -> vault-approle-creds2) 성공적으로 Jenkins 파이프라인이 실행된 것을 알 수 있습니다.
# ttl 값 바꾸어 AppRole 작성
❯ vault write auth/approle/role/sampleapp-role \
  secret_id_ttl=0 \
  secret_id_num_uses=0
Success! Data written to: auth/approle/role/sampleapp-role

# ROLE_ID는 변동 없으나, SECRET_ID는 변동
❯ ROLE_ID=$(vault read -field=role_id auth/approle/role/sampleapp-role/role-id)
❯ SECRET_ID=$(vault write -f -field=secret_id auth/approle/role/sampleapp-role/secret-id)

# 이 후 새로 갱신된 ROLE_ID, SECRET_ID 값을 Jenkins Vault Credentials에 등록

Started by user yoo
[Pipeline] Start of Pipeline
[Pipeline] node
Running on Jenkins in /var/jenkins_home/workspace/jenkins-vault-kv
[Pipeline] {
[Pipeline] withEnv
[Pipeline] {
[Pipeline] stage
[Pipeline] { (Read Vault Secret)
[Pipeline] withVault
Retrieving secret: secret/sampleapp/config
[Pipeline] {
[Pipeline] sh
+ echo Username from Vault: ****
Username from Vault: ****
+ echo Password from Vault: ****
Password from Vault: ****
[Pipeline] script
[Pipeline] {
[Pipeline] echo
Warning: A secret was passed to "echo" using Groovy String interpolation, which is insecure.
		 Affected argument(s) used the following variable(s): [USERNAME]
		 See https://jenkins.io/redirect/groovy-string-interpolation for details.
Username (env): ****
[Pipeline] echo
Warning: A secret was passed to "echo" using Groovy String interpolation, which is insecure.
		 Affected argument(s) used the following variable(s): [PASSWORD]
		 See https://jenkins.io/redirect/groovy-string-interpolation for details.
Password (env): ****
[Pipeline] }
[Pipeline] // script
[Pipeline] }
[Pipeline] // withVault
[Pipeline] }
[Pipeline] // stage
[Pipeline] }
[Pipeline] // withEnv
[Pipeline] }
[Pipeline] // node
[Pipeline] End of Pipeline
Finished: SUCCESS
ArgoCD + Valut Plugin (Kubernetes Auth/AppRole) -> CD
GitOps 기반 CD 환경에서는 ArgoCD Vault Plugin(AVP)을 활용해 Kubernetes 리소스에 Vault 시크릿을 직접 주입할 수 있습니다.
ArgoCD Vault Plugin
- 다양한 시크릿 백엔드 지원 (Vault, AWS Secrets Manager, IBM 등)
- Secret뿐 아니라 ConfigMap, Deployment 등 모든 리소스에 시크릿을 삽입 가능
- CRD나 별도 Operator 없이 GitOps로 시크릿 관리 가능
공식 문서에서는 4가지 설치 방식을 제안하지만, 실습에서는 적합한 대표 방식 2가지를 소개합니다.
1. InitContainer 방식
- argocd-repo-server에 InitContainer를 붙여 AVP 바이너리를 설치 또는 커스텀 이미지에 포함
2. Sidecar 컨테이너 방식
- ArgoCD repo-server에 AVP가 포함된 사이드카 추가
- ArgoCD v2.4.0 이상에서 사용 가능하며, 보안 및 유지보수에 유리
1. AgoCD Vault Plugin을 위한 Credentials 활성화 - AppRole 인증
argocd의 플러그인 사용을 위한 argocd 플러그인 시크릿을 배포합니다.
❯ kubectl apply -f - <<EOF
kind: Secret
apiVersion: v1
metadata:
  name: argocd-vault-plugin-credentials
  namespace: argocd
type: Opaque
stringData:
  VAULT_ADDR: "http://vault.vault:8200"
  AVP_TYPE: "vault"
  AVP_AUTH_TYPE: "approle"
  AVP_ROLE_ID: 3233cd29-862d-047e-216b-b43aaca6a12c
  AVP_SECRET_ID: a8dac081-7e11-e8b9-5e8b-2117be245714
EOF
2. ArgoCD Vault Plugin 설치
사전에 플러그인을 레포에 정리하여 올려주셔서 해당 레포지토리 파일을 사용하였습니다.
❯ git clone https://github.com/hyungwook0221/argocd-vault-plugin.git
❯ cd argocd-vault-plugin/manifests/cmp-sidecar
3. 샘플 Application 배포하여 Vault와 동기화
GitHub에 저장된 Helm Repo을 배포하며, Helm 메니페스트 내에 변수로 치환된 값(username/password)을 CD 단계에서 Vault 통해서 읽고 렌더링하여 배포합니다.
❯ kubectl apply -n argocd -f - <<EOF
apiVersion: argoproj.io/v1alpha1
kind: Application
metadata:
  name: demo
  namespace: argocd
  finalizers:
  - resources-finalizer.argocd.argoproj.io
spec:
  destination:
    namespace: argocd
    server: https://kubernetes.default.svc
  project: default
  source:
    path: infra/helm
    repoURL: https://github.com/hyungwook0221/spring-boot-debug-app
    targetRevision: main
    plugin:
      name: argocd-vault-plugin-helm
      env:
        - name: HELM_ARGS
          value: -f new-values.yaml
  syncPolicy:
    automated:
      prune: true
      selfHeal: true
EOF
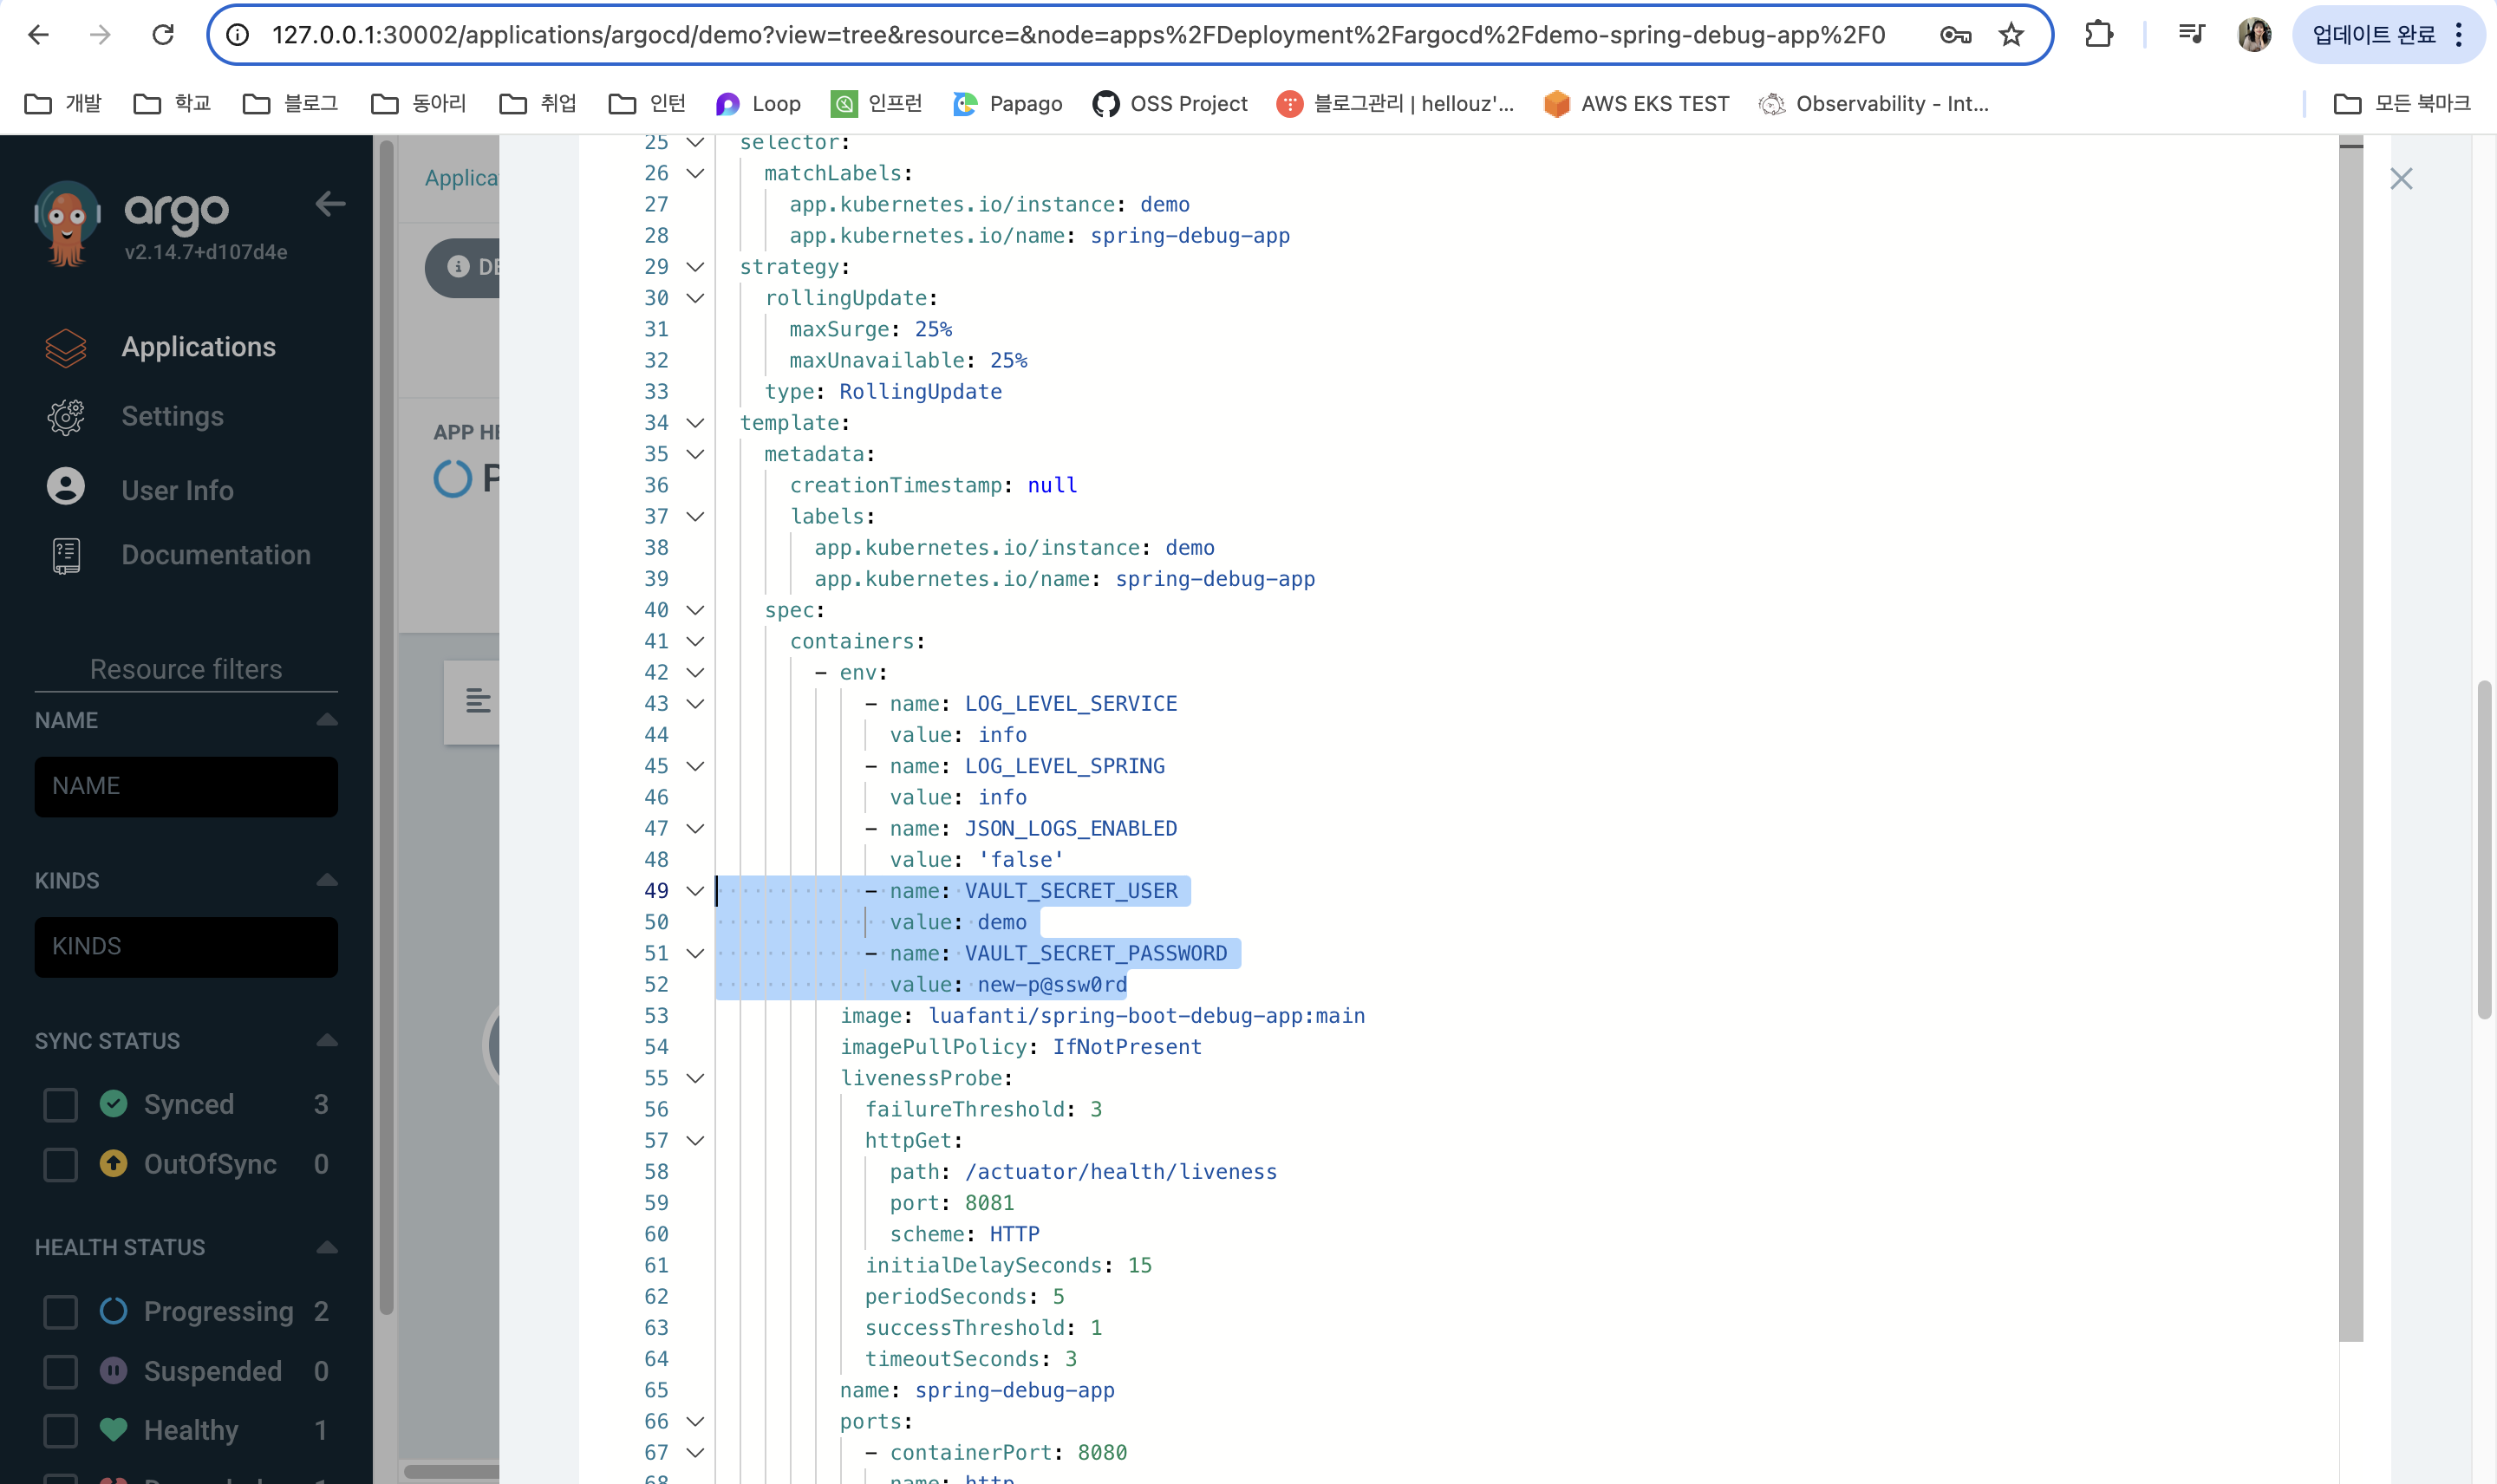
Application에서 배포할 때 참조하는 news-vaules.yaml 파일은 vault secret user와 password에 대한 정보값이 추가된 vaule 파일입니다.
serviceAccount:
  create: true

image:
  repository: luafanti/spring-boot-debug-app
  tag: main
  pullPolicy: IfNotPresent

replicaCount: 1

resources:
  memoryRequest: 256Mi
  memoryLimit: 512Mi
  cpuRequest: 500m
  cpuLimit: 1

probes:
  liveness:
    initialDelaySeconds: 15
    path: /actuator/health/liveness
    failureThreshold: 3
    successThreshold: 1
    timeoutSeconds: 3
    periodSeconds: 5
  readiness:
    initialDelaySeconds: 15
    path: /actuator/health/readiness
    failureThreshold: 3
    successThreshold: 1
    timeoutSeconds: 3
    periodSeconds: 5

ports:
  http:
    name: http
    value: 8080
  management:
    name: management
    value: 8081

envs:
  - name: VAULT_SECRET_USER
    value: <path:secret/data/sampleapp/config#username>
  - name: VAULT_SECRET_PASSWORD
    value: <path:secret/data/sampleapp/config#password>

log:
  level:
    spring: "info"
    service: "info"
실제로 배포하였을 때, argocd Vault Plugin이 적용되었고, deployment에 기존 vault에 저장하였던 유저이름과 비밀번호가 환경변수로 들어가있는 것을 알 수 있습니다.
'스터디 > AEWS' 카테고리의 다른 글
| [AEWS] 12주차 Amazon VPC Lattice for Amazon EKS (1) | 2025.04.28 |
|---|---|
| [AEWS] 11주차 GenAI with Inferentia & FSx Workshop (0) | 2025.04.20 |
| [AEWS] 10주차 Vault 이해하기 (2) | 2025.04.13 |
| [AEWS] 9주차 EKS 클러스터 업그레이드 - Blue/Green Migration (0) | 2025.04.05 |
| [AEWS] 8주차 Argo Rollout 이해하기 (0) | 2025.03.30 |